Southern classic, Brunswick Stew

The Alaska days are getting longer. The sun is still up as I leave the clinic at 4:30, a nice change from just a few weeks ago. But there’s a hard frost on the ground most mornings, and we’re nowhere near spring temps yet.

So while spring is on the calendar’s horizon, it’s not quite here in person. I  wear my favorite cozy sweaters, and plan hearty dinners that feed the body and comfort the soul.

One of my favorites is an old traditional stew, one of those Southern staples that has a million different recipes, all labeled “Brunswick Stew,” but really representing a variety of  regional dishes, with everything from chicken to pork to beef to squirrel (does anyone eat squirrel now?) complete with a range of vegetables.

To be fair, I think the recipes with squirrel are mostly from a century or so back. 🙂 (My dad used to hunt squirrels sometimes, and he ate them too. He grew up in the country, and I guess squirrels were a delicacy in his youth.)

My version of this stew is one I inherited through marriage. My husband’s maternal grandmother, “Mom-mom,” used to make this dish, and I make it like she did. At least, I think I do. I don’t know that I ever saw the written recipe, but I watched her make it in my early years of marriage, and I try to re-create the flavors I remember from years ago.

I can give you a list of ingredients, and some general direction. After that, this recipe is  mostly trial and error, and personal taste is critical in finding just the right balance of seasonings and heat.

Brunswick Stew, from Mary Downer

  • Boneless beef roast (or I sometimes use good quality beef stew cuts)
  • 2 stalks celery, finely diced
  • 1 medium sweet onion, finely diced
  • 1 or 2 cans Le Sueur peas
  • 1 or 2 cans premium creamed corn
  • 4 or 5 russet potatoes, peeled and small dice
  • Worcestershire sauce, to taste
  • Black pepper, to taste
  • Salt, to taste
  • Heinz Ketchup, to taste
  • Tabasco sauce, to taste

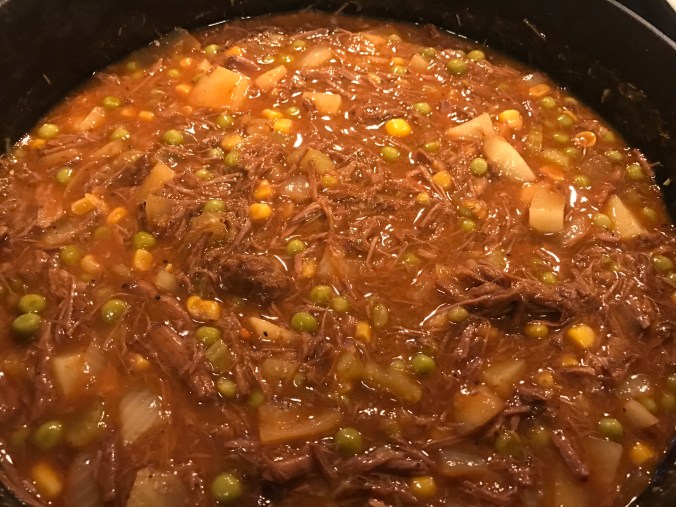
Method: I like to crock pot the beef until it’s fall-apart tender. Season beef with salt and pepper, add water to cover, and set the crockpot to high. I usually cook the meat a few hours, check to see if it easily shreds, and when it does, it’s done. You can section the meat and  pulse it a few times in a food processor if you want. If you use beef stew cuts, the beef will “self-shred” as you add the other ingredients and stir as the stew comes together. Either is fine, choose what you like, depending on how finely you want the meat to be shredded. (The shredded texture is one of the signatures of this dish, this is not a stew with the traditional large chunks of meat. Also, many recipes use a mix of beef and pork, or pork and chicken. I don’t ever recall this family recipe with anything other than beef, but you can mix it up if you like.)

After the beef is cooked, remove the meat and strain the broth, reserving the broth for the stew. If you’re shredding the cooked beef in a processor, this is the time to do that. Place the prepared meat in a dutch oven on top of your range, and add the other ingredients: celery, onion, canned vegetables, and the potatoes. I like to start with one can each of the veggies, you can always add the second one if you choose. (Usually I prefer fresh or frozen vegetables, but trust me, canned is perfect here.) I judge the amount of vegetables to add based on the meat/veg ratio; make your stew to your preference. You’ll see this makes a large quantity when you get everything in the pot. It’s a good choice for a group, or for a week when you want easy leftovers.

When all the vegetables are in, begin adding the Worcestershire sauce and the ketchup. You’re going to want a lot of ketchup, I have easily used a whole bottle, and probably a third to half a bottle of  Worcestershire. (Sorry, I never saw Mom-mom measure this…you have to taste your way through this dish!) You can add reserved broth from the meat to thin the stew if you like.

Here’s the reason for the ketchup: it’s sweeter than tomato paste or sauce, and the little bit of sweetness is perfect here. Don’t worry, it’s offset by the Worcestershire sauce. You’re looking for a reddish-brown color after you add the ketchup, this dish will not look like a red pasta sauce. You don’t want it to be too thick or thin, so add a bit of the ketchup, Worcestershire sauce, and the beef stock in increments, and give it a few minutes for flavors to blend before you sample. (You can add Tabasco sauce also if you like. For me, that’s an individual add-at-the-table option.)

When I think the seasoning is about right, I put the whole thing the oven, 350 degrees, to cook down a bit.

img_0509

I love to make this on Saturday, and let it just simmer away. Give it a stir now and then, add a bit more of whatever you think it needs, and wait impatiently for dinner. After a few hours, you have the perfect winter dish…delicious, hearty, warm, and all you need to add for a complete meal is a spoon. A crusty bread and salad are good too.

Here’s to winter feasting!

~ Sheila


Foodies…and not

English: The logo of Food Network.My major TV indulgence is Food Network. Most of my TV time comes when we’re in Metlakatla. When Rob covers a weekend of call there, I use the time to catch up with online tasks, and usually have Food Network running in the background. I’ve learned a lot from programs over the years. But some are just painful to watch. The current episodes of the Worst Cooks in America are right up there. I mean, how can anyone be that bad in the kitchen? Really?

With all the websites, blogs, cookbooks, cooking shows etc., offering recipes and cooking how-to advice…to say nothing of friends and family who could mentor…is it really possible to be as clueless as these people are? I mean, get in the kitchen and try something…start banging around, learn by doing. There are YouTube videos that show how to cut veggies, how to bake, how to cook almost anything you can imagine. There’s literally an embarrassment of riches when it comes to resources for home cooks.

You could make that argument for a lot of things. But while I don’t have to know how to repair my plumbing or rebuild my car engine, I like to eat pretty regularly. That’s such a mystery to me…how could something as basic as food be unexplored?  I understand some people just aren’t fascinated with all things food (unlike me and most of the rest of the world). But even if it isn’t a consuming interest, everyone has to eat something. Wouldn’t it be better it the something was delicious?

Food games and adventures  for family and friends:

~Get to know a little more about your group’s food loves. Here are some questions to share around the table. Works best if you’re eating something delicious while you share! Work your way through the whole list, or pick just a couple of questions. I definitely recommend including the last one…always good to associate memory with food. You may be surprised by the responses.

  1. What is your favorite food?
  2. Favorite food/dish in a specific category (main dish, finger foods, comfort food, dessert, breakfast…whatever you want to choose)
  3. Favorite restaurant…fast food, local restaurants, chains, diners, etc…
  4. Favorite chef (well-known from TV or author, or someone you know in person)
  5. Who is your favorite home cook? In your family? Among your friends?
  6. What’s your favorite holiday food dish?
  7. Favorite grocery store food item (ice cream, cookies, chips, etc.)
  8. Favorite international cuisine?
  9. Worst thing you ever ate?
  10. Best thing you ever ate?
  11. Bonus question…best memory associated with food

~Family members cook!  Give each one in the family a night each week, or once a month (whatever works) to be the head chef.  Everyone else helps prep or clean up. Each person can showcase their favorite foods, type of cuisine, etc. Have breakfast for dinner, let a child experiment with flavors (that’s how my son invented cinnamon toast grilled ham and cheese…not a flavor combination I would repeat, but it was a learning experience for him); or choose dishes new to everyone to make and taste.

~Mystery food! Let everyone in your family choose a dish or ingredient or cooking method no one has tried. Try it! Have a mystery food dinner night once a month, or as often as you choose. Rotate through everyone’s choices, then start over. Have a prize for the food that is most unusual.

~Experiment with planting vegetables. If you have kids, lots of fun ahead with this! But even if you don’t, it’s great to learn a bit about gardening, and see what you can do, with or without a yard. No yard, no problem! Check out container gardening. Again, there’s a wealth of information and resources online.

~Check out CSAs…Community Supported Agriculture is another way to access fresh fruit, vegetables, and other items from local farmers and producers. Visit http://www.localharvest.org/csa/ to learn more.

~Visit your local Farmers’ Market. I love shopping at farmers’ markets and buying from local vendors showcasing their products. In addition to fresh produce, you can often find vendors selling breads, honey, cut flowers, herbal preparations, essential oils, simple breakfast or lunch fare, and a wide variety of crafts, jewelry. This is another wonderful way to support local agriculture and eat clean.

~Share the shopping! If you have kids at home, (and they’re old enough) have each one plan the shopping for the week, and participate in the actual marketing. Doing this will give them experience in budgeting, planning menus, checking food inventory, layout of markets, and familiarity with foods they may not know. There’s a lot of education waiting at the grocery!

~Have a cook-off event. I’ve seen this done with local restaurant chefs here in Ketchikan. Just copy your favorite food contest show…choose a set theme or have mystery ingredients; make it a one event evening or a multi-night contest. Have prizes, or do the whole thing just for the fun and glory of choosing a victor.

~Form a dinner / supper club. Make up the rules that work for the group. Meet once a month or once a quarter. Have the dinners revolve around seasons, or events: birthdays, sports, anything you choose. Each host can choose a menu, or put menus or types of cuisine in a dish and draw to see what each host will cook for the group. Or each dinner can be a joint effort, with everyone who attends bringing a portion of the planned menu; rotate the house for the event, and share the cooking duties.

~Plan a progressive dinner. These are retro, but so fun. Great for larger groups, but take some planning. If you’ve never done this, here’s how it works. You have a host for appetizers, a host for the main course, and a host for dessert. Or if you want to come up with more courses, add more hosts, but you need at least three. Guests move from house to house, (or venue to venue…doesn’t have to be hosted in a home setting). The host from each location moves with the group to the next stop, so everyone gets to enjoy the party. You can have an overall theme, or each course can stand alone. I think it’s best to have a theme, but do whatever works for the group. Decide on a budget for the event and have everyone chip in to cover expenses. Just another way to make food fun, and enjoy a night with family or friends. Go a step further and combine the food event with a fundraiser for your favorite charity, school program, youth activity, etc., Everyone wins!

Enjoy! And if you have variations…what food adventures do you share with family and friends?… I’d love to hear about them.

Colorado Maple Bran Muffins

So, Saturday morning needs something more than cold cereal or a yogurt. Some weekends that means pancakes or the Southern treat of grits and sausage. But today I’m falling back on an old reliable that combines comfort and just a wee nod to the healthy side of baking. I made bran muffins, a slightly adjusted variation of the classic recipe that can live in your fridge for several days, allowing you to produce a warm breakfast treat in a matter of minutes.

I used to make this one regularly for my kids. These muffins are one of my son’s favorites, always on the menu for those rare occasions when he has a chance to visit us in Alaska. Brings back good memories of chilly Colorado mornings and the aromas of coffee and maple in the kitchen. Delicious!

Colorado Maple Bran Muffins
 
1 1/4 cups all-purpose flour
1/2 cup white sugar
1/2 cup brown sugar
1 tablespoon baking powder + 1 teaspoon baking soda
1/4 teaspoon salt
2 cups Kellogg’s All Bran Cereal
1 1/4 cup milk OR buttermilk (use whatever you have on hand)
1 egg
1/4 cup vegetable oil OR melted butter
1 tablespoon maple flavoring
1 cup raisins
 
OR

You can use Kellogg’s Raisin Bran cereal in this recipe instead of the All Bran Cereal and raisins…just add 3 cups of the Raisin Bran cereal in place of the 2 cups of All Bran and 1 cup of raisins.
 
 
Stir together flour, sugars, baking powder, soda, and salt.
 
In large mixing bowl, combine cereal and milk. Let stand about 5 minutes.
Add egg, oil OR butter, and mix well. 
Add flour mixture, stirring until ingredients are combined. Add raisins if using the All Bran/raisin combination. 

Ooey gooey batter

Ooey gooey batter

 
Spray muffin tin with cooking spray, or use cupcake papers. Spoon batter into pan and bake at 375 degrees for 15 to 20 minutes, until lightly browned. Serve warm with butter. YUM!
 
The batter will keep well in the fridge for several days. If muffin batter has been in fridge for a few days, add a little more baking powder and soda (about 1 teaspoon each) to help muffins rise when baked.

If you want to make this recipe more healthy, replace 1/4 cup up to 1/2 cup of the AP flour with wheat germ, flax seed or flax meal. You can also replace the butter or oil with applesauce or a ripe banana, and add nuts for some crunch factor. It’s a pretty forgiving recipe and can take almost any substitution you throw at it. But the basic version is tasty too. Just keep in mind if you mix it up, you’ll need to watch baking times closely and adjust if necessary.

Mmmmmm....

Mmmmmm….I see raisins peeking!


Enjoy!

In case you missed it…World Nutella Day!

WorldNutellaDay_logo_s-e1391459886361-300x207In the flurry of sports headlines…today is the parade for the Super Bowl champs, the Seattle Seahawks, (boy, was that painful!) and there’s ongoing news and drama around the Sochi Olympics…you could be missing an exciting new entry to the list of “world” days: World Nutella Day. It’s a young event, launched in 2007, so momentum is still building. 🙂

Complete with website, World Nutella Day provides the perfect excuse for uniting spoon and spread, for enjoying chocolate creaminess long before the Easter bunny hops this way. This is a day for lip-licking, jar-cleaning, smear-on-any surface goodness, and I’m proud to partake!

To celebrate in style, check out the plethora of Nutella recipes you can try. Pinterest offers a gold mine. Nutella has come a long way, moving beyond a humble spread for toast to star in ice cream, pastries, cakes, brownies…any place you would want chocolate, you can invite Nutella. And really…is there any dessert that doesn’t deserve a chocolate option?

KeepCalm_NutellaOn

Super Bowl!

Good morning sports fans! Surprise, surprise, here I am among the millions, waiting to watch the Super Bowl!

Not my usual thing. I like a good game, now and then, but I’m hardly a die-hard sports fanatic. But with Denver and Seattle in the big game, I have to watch and cheer. No, strike that…I get to watch and cheer! 🙂

I’m cheering for the Broncos, of course. We lived in Colorado for almost 20 years, and you’d have to live under a rock there to not be at least a little bit of a Bronco fan. And I have a soft spot in my heart for Peyton Manning. He was a favorite of my dad’s, and Peyton’s dad, Archie, was a legend of Ole Miss football, many moons ago. It was long before our time at the school, but that legacy lingered when we were there. So it’s an easy choice, despite the fact that I’ve spent a lot more time in Seattle in recent years than in Colorado.

We used to go to Broncos games during the John Elway era. Rob had two season tickets…usually it was him and one of the kids who went to the stadium (the old Mile High) for the games. Occasionally we would get an extra couple of tickets and all of us would go. There was a guy who sat behind our seats, and he was a fixture on those Sunday afternoons. He would boom out, now and then, in a random fashion, “SUPER BOWL!” Didn’t matter if the Broncos were losing or winning. He always had faith!

Well, some years, he was right. I’m sure he’s long gone, just like that old stadium. But the fans keep going, the team keeps going, and Peyton! Well, you have to love his drive 🙂

We’re in Metlakatla this weekend, with Rob covering call, so hopefully no one will have an emergency this afternoon. The game starts at 3:30 our time, and we’re joining some of the clinic staff in front of a big screen to see the commercials, the game, and eat our way through a few game day treats.

Since dips are an eternal favorite, and artichokes are a personal favorite, I’m taking my cheesy, garlicky, yummy, completely decadent combination of the two.

Baked Artichoke Dip

  • Marinated artichoke hearts, 2 jars (6.5 oz each)
  • 2 cups mayonnaise
  • 1 cup shredded parmesan
  • 1 cup shredded Mozzarella
  • 1 clove garlic, crushed
  • 1 yellow onion, medium dice
  • Dash of Worcestershire sauce
  • Pepper to taste

Pre-heat oven to 350°. Mix all ingredients together and bake for 30 to 40 minutes. Serve warm with crackers or other dippers of choice…veggies, pita chips, flatbread. Everything works with this dip.

I’m also honoring the tradition of buffalo wings, but doing an updated version. For you doubters out there, give Buffalo Cauliflower a try:

Spicy Buffalo Cauliflower

And last, for a sweet treat (you know I’m never without dessert!), an old favorite:

Lemon Cream Cheese Cupcakes

Well, it’s still early here in Alaska. So excuse me now, I have a little baking left to do before I put my game face on.

Go Broncos!

Playing with my food

Pumpkin love

I’ve been playing, enjoying a stretch of nesting. I can’t really get into cooking if I’m only passing through my kitchen. I need a little time to dig in and be inspired. Usually that involves a craving that needs satisfying or curiosity about a new recipe. I have to have enough time at home to justify the effort of shopping and cooking. Because, let’s face it, if we’re only passing through, leftovers are going to be a problem. You can’t fully engage in the kitchen and be on the run at the same time. The weeks we’re living in out-of-town clinic apartments do not inspire experiments; those weeks demand convenience. But home plus time equals satisfaction. And this week satisfaction is stirring a sauce and baking goodness.

I just made a delicious butternut squash lasagna. Yes, I’m continuing my affair with the butternut. It’s versatile and tasty. Who knew this would be my new favorite base for soups and hearty casseroles? The more I work with squash (should that be squashes? not sure about the plural form) the more I find to do with them. You can cook them almost any way…roast in the oven, simmer in water, steam, microwave.

And here’s my latest trick: you don’t have to de-seed before cooking. (If you’re simmering squash on the stove top for a soup, it’s probably best to de-seed and cube the squash first.) The minimalist method works well for oven roasting or microwaving. You can literally put a whole squash in the oven, crank the temp to 400 degrees, and bake away. Baking time will vary depending on size of squash. Check for tenderness after about 45 minutes. Cook longer if the squash does NOT pierce easily with a sharp knife. When the squash is tender, remove from heat, cool, then peel and remove seeds, reserving the cooked squash for your recipe.

I haven’t tried microwaving a butternut or acorn squash, but it works like a charm for the spaghetti variety. Just pierce the spaghetti squash a few times with a sharp knife to release steam during cooking. I microwave in increments of 3 to 4 minutes so I don’t over-cook. Cooking time will vary depending on the size of the squash and the power of the microwave. The intricacies of prepping spaghetti squash are for another post, but I thought I’d throw in this cooking method as a freebie since I’m on the general subject.

Let me just add that if you’re looking to entertain yourself on a slow night, cook up one of these babies and then cut it open and begin to shred the squash with a fork. I’m probably going to regret admitting this, but I am fascinated with the process of turning spaghetti squash into something that looks just like pasta. Now you’re either going to feel sorry for me and wonder how spaghetti squash can be so exciting…or you’re going to check it out and be equally enthralled by the pasta-look-alike squash. Whichever it is, it can be your little secret.

Roasted lasagna beauty

Roasted lasagna beauty

Roasted Butternut Squash Lasagna

Ingredients:

1 3-pound butternut squash, peeled, seeded and chopped into 1-inch chunks.
2 tablespoons olive oil
salt and fresh ground pepper to taste
4 tablespoons butter
4 cloves garlic
1 small onion, diced
1 small yellow or orange bell pepper, diced
1/4 cup all-purpose flour
2 cups milk
1 cup chicken broth
salt and fresh ground pepper to taste
1 tablespoon fresh snipped rosemary
1/2 tsp nutmeg
1 cup shredded Parmesan Cheese
8 oz Ricotta
Shredded Mozzarella, about 2 cups
Fresh lasagna noodles or no-boil lasagna noodles
1 cup heavy whipping cream

Instructions:

Pre-heat oven to 400.
Lightly grease a baking sheet and set aside.
Combine chopped squash, olive oil, salt and pepper in a mixing bowl and toss to coat.
Spread the squash in a single layer on the prepared baking sheet.
Roast the squash in the oven for 40 minutes, stirring once or twice, until soft.

(OR…just cook the squash whole in the oven as described above, and then peel and cube for the sauce after squash is baked.)

While the squash bakes, make the sauce.

Heat butter over in a large saucepan over medium heat.
Add garlic, onion and bell pepper and cook until veggies are tender.
Whisk in flour.
Slowly add broth and milk and season with salt and pepper.
Cook and stir frequently until thickened and bubbly, about 8 to 10 minutes.

Remove squash from oven and reduce oven temperature to 375.

Add chopped butternut squash, rosemary and nutmeg into sauce. You can blend with an immersion blender if you want a smoother texture for the filling.

Butter a 3-quart casserole dish.
Spoon sauce over the bottom of prepared baking dish.
Layer three or four noodles on top of sauce.
Top noodles with a layer of Ricotta and shredded Mozzarella. Top with 1/3 of the Parmesan.
Ladle sauce on top of the noodles.
Repeat layering of noodles, sauce, Ricotta, Mozzarella, and Parmesan cheeses two more times.
Pour whipping cream over entire dish.
Sprinkle with remaining Parmesan cheese.
Cover dish with foil.

Bake for 35 to 40 minutes, or until bubbly.
Uncover and continue to bake for 10 more minutes, or until top is lightly browned.
Let stand 15 minutes before serving.
Cut and serve.

Ah, my new favorite comfort. So beautiful, so filling, so satisfying. This is a dish to look forward to all Monday long!

My dinner

October dinner

What’s a yummy dinner without a little sweet treat to finish? This recipe for brownies is tried and true. I just adapted a favorite dessert to make individual bites. I made 1/2 recipe of Hershey’s Fudge Pie, then scooped spoonfuls of batter into a silicone pan. Little tastes of heaven! I have ideas for this little jewel. I can think of lots of recipes that would be perfect to make with this shape. I’m not always a fan of silicone baking, but this is a winner.

I’ve shared this recipe before, but in case you missed it, here it is, in all its glorious chocolatey-ness.

Hershey’s Fudge Brownie Pie, or “Brownies Bites”

Reward for a Monday

Reward for a Monday

Ingredients:

2 eggs
1 cup sugar
1⁄2 cup (1 stick) butter, melted
1⁄2 cup all-purpose flour
1/3 cup Hershey’s Cocoa
1⁄4 tsp. salt
1 tsp. vanilla
1 cup chopped nuts (walnuts or pecans)

Instructions:

Heat oven to 350 degrees. Lightly grease an 8-inch pie pan.
Beat eggs; blend in sugar and melted butter. Stir in flour, cocoa and salt. Stir in vanilla and nuts.
Pour into prepared pie pan.
Bake 25 to 30 minutes or until almost set. (Pie will not test done in center). Cool; cut into wedges.
Serve with ice cream or whipped cream.

Fall into pumpkin

October is more than half done and I’m moving ever more swiftly into fall. Late summer has faded. My small flower bed is cleaned and tucked away under fresh bark chips to wait out the months till spring. Pumpkins and gourds are the centerpiece for my dining room table, and my taste has turned to hearty foods. Sweaters have come out of storage and back into my drawers. Flannel sheets are on my bed.

Pumpkins!

Pumpkins!

The light fades pretty quickly this far north. Just a few weeks ago the sun rose way too early. Now it’s tempting to stay snuggled in past the call of my alarm. It’s so dark out at 5:00 am. Definitely not time to get up.

In honor of the month, and the iconic pumpkin, in all its orange glory, I’m celebrating the color in food.

“I’m so glad I live in a world where there are Octobers.” ~ L.M. Montgomery, Anne of Green Gables

I was late to appreciate the value of squash in my life. I grew up with yellow squash and zucchini, as a Southern girl should. But other varieties did not grace my mother’s table. Gradually, curiosity overcame timidity, and I began buying unknown squashes to see what I might be missing. I tried acorn and butternut and spaghetti, the deep greens and variegated and lemon yellows adding a charming and rustic touch to my kitchen display, the squashes doing double duty, first as still life, and then, after a run in the oven, making a second appearance as star of dinner.

The focus of this post is butternut. It’s the right color (!) and one medium size squash makes a lovely pot of soup, enough to serve six people with normal appetites, or four quite hungry people, or one or two ravenous souls.

I began, as much of my recipe searching does these days, by scouring the internet to see what’s out there already. I had an autumn squash soup recently at Panera‘s, and it inspired me to create my own version, since the closest Panera’s is in Seattle, an expensive flight away from Ketchikan. I found several knock-off recipes. The one I chose is good, but different than the one I had at the restaurant…not as thick, and not quite as sweet. But of course you can easily adjust to your own taste. I would bet the Panera soup includes a touch of sugar, and probably has a roux base. This soup is just a hearty rendition of squash, onion, seasonings, broth, and cream. It’s tasty and couldn’t be easier. And my favorite thing is that it needs to simmer on the stove….a perfect fall afternoon activity! I put my soup on and just come back to check it now and then.

Butternut Squash Soup

2 tablespoons unsalted butter
1 small onion, diced
1 tablespoon fresh rosemary (1 teaspoon dried)
1 small butternut squash, peeled and chopped
6 1/3 cups chicken stock (50.4 ounces)
1 1/4 cups heavy cream (or use half and half, or milk)
1 teaspoon salt
1/2 teaspoon white pepper
1/2 cup chopped walnuts
Hot pepper sauce to taste

Melt butter over moderate heat in large saucepan. Add the onion and rosemary and cook until soft (approximately 5 minutes).

Add chopped squash, chicken stock, heavy cream, salt, white pepper and hot sauce. Reduce heat and cover. Simmer for approximately 2 hours – or until squash is tender.

Chop and peel the butternut

Chop and peel the butternut

Rough chop, all the good stuff

Rough chop, all the good stuff

Use blender (or immersion hand blender) to puree the hot soup. Toast walnuts to use for garnish. 

Taste of fall in a cream soup

Taste of fall in a cream soup

Note: you can puree the soup to a creamy consistency, or blend minimally  for a more rustic dish. (I used an immersion blender. This makes the job much easier than pouring hot soup into a blender. If you don’t have an immersion blender, I highly recommend buying one; you’ll find lots of uses for it to justify space in your kitchen.)

Soup in a crock

Soup in a crock

Serve with a hearty bread or grilled cheese. Mmmmm!

In keeping with my orange theme, I tried another recipe this week, this one a no-bake pumpkin dessert.

No Bake Pumpkin Cheesecake

Dessert in a glass!

Dessert in a glass!

For the crust 

1 sleeve graham crackers (about 9 crackers)
½ stick (4 tablespoons) butter, melted
2 tablespoons sugar
2 tablespoons brown sugar

For the filling 

1 8-ounce package cream cheese, softened to room temperature
1 15-ounce can pumpkin puree
3 teaspoons pumpkin pie spice
1 3.4 ounce package vanilla flavored instant pudding mix
1 14-ounce can sweetened condensed milk
Whipped cream, (in place of 12 oz container of Cool Whip) how to make your own whipped cream here 

Instructions

Place the graham crackers in the bowl of a food processor and pulse the crackers into fine crumbs. Add the melted butter, sugar and brown sugar and pulse until combined.

Spoon the crumbs into individual dishes for serving. Place in the refrigerator to set while you are preparing the filling.

In the bowl of a stand mixer with the paddle attachment, beat the cream cheese until light and creamy.

Add the pumpkin, pumpkin pie spice, and pudding mix and beat until completely mixed, scraping down the sides and bottom of the bowl to ensure that all ingredients are well combined.

Add the sweetened condensed milk and mix again until well combined.

Change your stand mixture attachment to the wire whisk. On slow speed, fold in whipped cream until well combined.

Allow the mixture to sit in the fridge for about an hour to firm up.

Using a large pastry bag with a large tip, or a spoon, top the graham cracker crust in each dish with the pumpkin mixture and refrigerate until ready to serve.

Garnish with additional whipped topping if desired.

Note: Feel free to use Cool Whip…I prefer real cream, and it holds up well. I find that this is one area that I’m a bit of a food snob. Notice I’m perfectly happy to use a pudding mix for this recipe. If you really want to be a purist, you could make a recipe of homemade vanilla pudding and use that in place of the instant mix. I might try that next time, but it was a busy day, and I had a mix in the pantry, so I was content to go with that.

I couldn’t resist trying this little treat. Any recipe that combines cream cheese and sweetened condensed milk is not to be missed. And this one is delicious.

I will also admit…an astonishing amount of the filling did not make it to the finished dessert. I tasted my way through a couple of servings, and will be required (!) to put in an extra session or two at the gym to offset my calorie intake for the day. But this is a price I’m willing to pay to enjoy a yummy treat and still be able to wear the new jeans I just bought 🙂

Happy stirring, tasting, and nesting!

Ugly Chocolate Cake

I’m craving chocolate. And not just any chocolate. I need chocolate cake. And not just any chocolate cake. I need the Ugly Chocolate Cake, aka, Hershey’s Perfectly Chocolate Chocolate Cake. Yep, the one off the back of the Hershey‘s Cocoa box. No upscale dark and expensive chocolate need apply for this job. But I promise you, somehow, unbelievably, the chocolate flavor in this cake is so good…well, one slice just won’t do the trick. You’ll need a little more, and maybe a little more after that. This cake is that good. This is a dense, moist, solid cake. No lighter than air texture here…this one has body, it has presence. And it has frosting. The frosting is just as wonderful as the cake. Well, make it and see for yourself.

Oh, and the “Ugly” title came from baking this at high altitudes, when we lived in the foothills above Denver. I always had trouble with getting the cake to turn out picture perfect, so we began calling my creation the “Ugly Chocolate Cake” because there was always a bit of frosting camouflage needed to make the layers look just right on the cake stand. But it was a label given with affection, and since the looks didn’t affect the taste, no one minded if the name wasn’t elegant.

You can get this off the back of the cocoa box, but why would you? I can tell you, that print is pretty small! So save yourself some squinting, and just copy from here:

Hershey’s “Perfectly Chocolate” Chocolate Cake

Chocolate goodness!

Chocolate goodness!

Skill Level: Beginner Prep Time: 15 Minutes

Ingredients

2 cups sugar
1-3/4 cups all-purpose flour
3/4 cup HERSHEY’S Cocoa
1-1/2 teaspoons baking powder
1-1/2 teaspoons baking soda
1 teaspoon salt
2 eggs
1 cup milk
1/2 cup vegetable oil
2 teaspoons vanilla extract
1 cup boiling water

“PERFECTLY CHOCOLATE” CHOCOLATE FROSTING (recipe follows)

Directions

1 Heat oven to 350°F. Grease and flour two 9-inch round baking pans.

2 Stir together sugar, flour, cocoa, baking powder, baking soda and salt in large bowl. Add eggs, milk, oil and vanilla; beat on medium speed of mixer 2 minutes. Stir in boiling water (batter will be thin). Pour batter into prepared pans.

3 Bake 30 to 35 minutes or until wooden pick inserted in center comes out clean. Cool 10 minutes; remove from pans to wire racks. Cool completely. Frost with “PERFECTLY CHOCOLATE” CHOCOLATE FROSTING. 10 to 12 servings.

VARIATIONS:
ONE-PAN CAKE: Grease and flour 13x9x2-inch baking pan. Heat oven to 350° F. Pour batter into prepared pan.

Bake 35 to 40 minutes. Cool completely. Frost.

THREE LAYER CAKE: Grease and flour three 8-inch round baking pans. Heat oven to 350°F. Pour batter into prepared pans. Bake 30 to 35 minutes. Cool 10 minutes; remove from pans to wire racks. Cool completely. Frost.

BUNDT CAKE: Grease and flour 12-cup fluted tube pan. Heat oven to 350°F. Pour batter into prepared pan. Bake 50 to 55 minutes. Cool 15 minutes; remove from pan to wire rack. Cool completely. Frost.

CUPCAKES: Line muffin cups (2-1/2 inches in diameter) with paper bake cups. Heat oven to 350°F. Fill cups 2/3 full with batter. Bake 22 to 25 minutes. Cool completely. Frost. About 30 cupcakes.

“PERFECTLY CHOCOLATE” CHOCOLATE FROSTING

1/2 cup (1 stick) butter or margarine 2/3 cup HERSHEY’S Cocoa
3 cups powdered sugar
1/3 cup milk
1 teaspoon vanilla extract

Melt butter. Stir in cocoa. Alternately add powdered sugar and milk, beating to spreading consistency. Add small amount additional milk, if needed. Stir in vanilla. About 2 cups frosting.

Enjoy!


Just couldn’t help myself

So it’s summer. It’s summer! Time for dinner on the deck, homemade ice cream, and if I’m lucky, good tomatoes. I stopped by the grocery on my way home tonight to pick up a few things and saw heirloom tomatoes were in stock. And like a magnet, pricey though they are, they drew me in. I put three luscious ones in my cart, and immediately, almost without conscious thought, my feet headed toward the bread aisle. When tomatoes are in season…and only home-grown or heirloom specimens are truly worthy…no anemic, plastic-looking hot-house varieties need apply…my favorite thing is a tomato sandwich. And that sandwich must be made with white bread. Can’t do wheat or oat bran or whole grain for this combo. I like hearty breads and brown breads and seeded breads. But as soon as tomatoes are in season, my tastes revert to childhood. And in my childhood, at least in my mother’s house, deep in the heart of Mississippi, the bread was always white.

I’m a purist when it comes to fresh tomatoes. A perfect summer tomato needs a sprinkle of sea salt. And that’s it. Pair with soft white bread and a generous slather of real mayonnaise and you have a taste of heaven. Some people toast the bread or add lettuce. Not me. Nope. All I want is the simplicity of summer flavor combined with the texture from childhood memory. And the bonus? No heating up the kitchen in the middle of our SE Alaska heat wave, and dinner is on the table in five. Perfect!

End of Summer Tomatoes

End of Summer Tomatoes (Photo credit: Wikipedia)

My new favorite food

As I’ve mentioned recently, we’re having a real summer here in SE Alaska! This was from last week, but today’s weather looked just like this. (On my phone, anyway…it was a little less sunny in reality. But no rain!)  If you know the Pacific Northwest, and SE Alaska, Summertime!you know how rare it is to have a week of sunshine in the forecast. Even more rare to have multiple weeks like that. And while we’ve had a few rainy days here and there, this is a summer to celebrate!

With summer comes grilling, and we’ve done a lot of that this month. I’ve been trying new recipes and decided to experiment with pizza on the grill. I’ve read about it, thought about it, and now, I’ve tried it. Let me tell you, it’s my new favorite thing. Worth doing, and so easy I wonder why I haven’t tried it before.

So here’s the way to do it:

There are lots of recipes to choose from. Here’s one I like:

Ingredients:

2 teaspoons instant yeast
2 teaspoons sugar
1 1/4 teaspoons salt
3 cups (11 ounces) all-purpose flour*
3/4 cup (6 ounces) lukewarm water
2 tablespoons (7/8 ounce) olive oil

*Substitute Whole Wheat flour for half of the all-purpose flour, if desired.

Method:

Mix all of the ingredients to make a soft, supple dough. Knead for 5 minutes, divide the dough in half, cover with lightly greased plastic wrap, and let rest and relax for 15 minutes (or for up to an hour or so; work it into your schedule as you see fit).

Grease two 12″ squares of parchment paper. Use your greased fingers to press each piece of dough on the parchment into an 11″ to 12″ circle about 1/8″ thick. Brush or spray the crusts with olive oil, and let them rest for about 30 minutes, while you pre-heat your grill.

To make grilled pizza: Be prepared to grill your pizza within 15 minutes of shaping it; you don’t want it to rise too much. So, make sure your barbecue grill is heated (or cooled) to medium-hot by the time the dough is ready to grill.

Set the rack 3″ to 4″ above the fire. Take one circle of dough, on its parchment, and swiftly but carefully turn it (dough down, parchment on top) onto the grill. Peel off the parchment.

After 1 minute, turn it over; it should be stiff enough to turn quite easily (if not, your grill isn’t hot enough). Layer with toppings. This is not the time to pile on the meat, cheese, veggies, etc. Since the pizza will be cooking very briefly, it’s better to top with just a minimal amount of stuff: thinly sliced veggies, a thin layer of cheese, etc.

Bake an additional 5 minutes or so, with the cover on (if your grill has a cover), or until the filling is hot and the cheese is melting. Adjust the temperature of the grill if the bottom is browning too quickly. And, move the pizza around on the grill if one side or the other starts to get too brown on the bottom. Repeat the grilling process with the other pizza.

We like veggie pizza. Marinated artichoke hearts, fresh sliced tomatoes, basil, mushrooms, peppers, red onion, salt and pepper over all, and top with a blend of shredded mozzarella and shaved parmesan…perfection! The pizza dough “bakes” up so light and airy on the grill it’s like eating something from a gourmet wood-fired pizzeria. The veggies get just slightly cooked so they taste incredibly fresh and keep a little of their crunchiness. The whole thing is warm and satisfying to eat, and so fast. I’m seriously thinking of making this again for the third time this week. Haven’t had my fill yet!