My brownie quest is DONE!

I’m a brownie lover…and who isn’t? Very few people can resist warm chocolate, gooey, dense, fudgey…well, there may be a few citrus lovers out there who rate tart higher than sweet, but I’ll ignore that for this post.

I have a few favorite recipes, each unique, and each fitting a specific kind of brownie need. After years of tasting, testing and searching, these are my top five:

  1. My newest discovery is so dense and fudge-like you could almost think you’re eating fudge. But you’re not. You’re eating heavenly Brown Butter Frosted Kahlua Brownies. This is a slight adaptation of the recipe I found on Pinterest. If you want to go chocolate all the way, substitute a good chocolate frosting for the brown butter shown here. I’ve only made this as given, but however you choose to frost, follow the directions for the brownie base closely. The instructions are a little fussy, but so worth it!  Check out Brownies with Brown Butter Frosting and get ready for the smiles all around.
  2. An old standby, this one is the perfect brownie to serve warm and gooey with ice cream. I usually bake this in a pie dish and serve wedges of it like a crustless pie. But this slice is just a brownie in another shape. One nice thing…you get all this delicious fudginess with baking cocoa as the only chocolate ingredient…no fancy imports required! Try Hershey’s Fudge Brownie Pie with a scoop of caramel ice-cream and a sprinkling of walnuts for comfort in a spoon.
  3. A crowd pleaser (used to be a hit with my kids’ youth group)…an oldie but a goodie: Texas Brownies. These are frosted, but a little more cake-like than fudgey. They whip up easily, frost beautifully, and the recipe makes a jelly roll pan full…perfect for a big party or summer picnic. Enjoy Texas Brownies when you want to feed a crowd, or have a really big craving.
  4. For a nod to banana bread, try these luscious and tender Banana Brownies. They are scrumptious! I could eat an embarrassing amount of these, warm and fragrant, right after they’re frosted. Enjoy Banana Brownie Bars and get a little fruit in your brownie serving. With some clever rationalizing, you could even convince yourself that these are healthy!
  5. And finally…I wasn’t really going to leave the citrus crowd high and dry. This recipe for lemon brownies (I know…should be a different term…yellowies?) gives you the perfect texture with all the goodness of sweet and tart. For a totally different take on the “brownie” experience, whip up a batch of Lemon Brownies.

My best brownie baking tip…Never, never, never over bake! And, unless you’re baking for a party, plan to make your treat when you have an easy and automatic way to share…take them in to your office or a school function, or share with a neighbor. My strategy when I bake: divide and enjoy. I satisfy my need to bake and taste, and I get the extras out the door. A win for everyone!

Monday morning Cinnamon Rolls

So tomorrow I’m bringing cinnamon rolls to work. These are not from a bakery or out of a refrigerated roll tube. These are homemade, gooey, delicious and oversized. These are the real deal. The recipe follows below.

But first, let me tell you that this isn’t just a bit of holiday festivity for co-workers. No, this is part of my work philosophy. I believe in doing a good job of fulfilling my responsibilities. But there are things that go along with doing a good job. This is what I do try to do:

~ Try to say “yes” more than “no.” Be positive. I call this my “yes policy.” This is not about being a “yes man,” or about letting others dump on me. It is about being willing to try, and being gracious.

~ Be transparent; apologize when necessary; take responsibility!

~ Smile; have an attitude of gratitude. But be sincere; you can’t fake this.

~ Commit to what you’re trying to accomplish; coach it; be it.

~ And last, bring food. I’ve never worked in any setting where good food isn’t appreciated. This isn’t about getting anything in return. This is about now and then sharing a treat, whether homemade or a pickup from the local doughnut shop. I used to buy ice cream fudge bars or ice cream sandwiches in the summer to take in at a past job. It really doesn’t matter what the treat is. Just do it, and do it regularly.

Cinnamon Rolls
(thank you, Ann!)

I’ve never had a failure with this recipe; it was given to me by a dear friend whose skill in the kitchen is legendary! This isn’t a recipe to make if you’re watching your calories. But for those occasions when you want a wonderful breakfast treat, to pull out all the stops, this is a winner. Although the instructions are long, each step is actually quick and easy…don’t let the lengthy instructions intimidate you!

The dough is easier to make if you have a stand mixer (like a Kitchen Aid) so the mixer does the work for you. You do not have to knead the dough by hand, you only need to mix it with the dough hook. (If you don’t have a stand mixer, you can mix the dough by hand, that’s easy too).

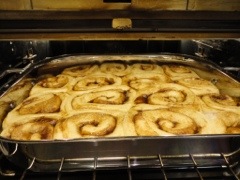
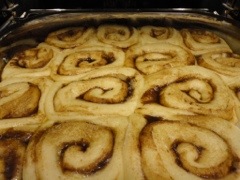
I break this into three steps and it keeps the whole process from being too lengthy. To have warm rolls for breakfast, (this is our standard Christmas morning treat) mix the dough the afternoon or evening before. I usually try to mix the dough early enough in the afternoon so I can let the dough rise six hours and then roll the dough out and slice before going to bed. When the dough is rolled out, sliced, and the rolls are put into the baking pan, I cover the pan with Saran wrap, slide the pan into the fridge, and leave it overnight. In the morning, I put the cold baking dish into a cold oven. (Very important! Never put a cold dish into a hot oven; if the baking dish is glass it might crack.) I put the oven on the lowest temp, about 170 degrees, let the rolls rise about half an hour, or until the rolls have at least doubled in size, then turn up the oven to 350 degrees and bake the rolls for approximately 35 minutes. While the rolls are baking, mix the icing. This only takes a couple of minutes, so the whole process in the morning is just a matter of putting the rolls in the oven and drizzling the icing over the rolls after baking.

An alternative, if you have time, is to allow the rolls come to room temperature and rise till the dough is at least doubled. If your timing allows (perfect if you are serving these at brunch), just take the rolls out of the fridge in the morning and let them sit for at least a couple of hours prior to baking. If they still need a little more rising, you can always speed the process along a bit by putting them into a low-temp oven as described above.

Dough
1 cup softened butter
1/4 cup sugar
1 cup hot water
2 eggs
2 tsp salt
2 packages of active dry yeast
1 cup warm water, or you can use 1 cup of warm milk instead of water
6 cups of all purpose flour

Combine the butter, sugar and hot water in mixer bowl. Stir until butter is melted. Allow this to cool until just warm (if mixture is too hot, it will kill the yeast). Add eggs and salt to butter mixture when cooled. Combine yeast with 1 cup of warm water (or warm milk if substituting milk for water). Give the yeast a few minutes to proof (it will foam up). Add yeast mixture to butter mixture. Add flour 2 cups at a time and combine using mixer dough hook. When all the flour is added, cover the dough in the mixing bowl and refrigerate for six hours or overnight.

Filling
1/2 cup (1 stick) softened butter
brown or white sugar, 1 1/4 cups (more or less, to taste)
cinnamon (use a lot, these are cinnamon rolls!)

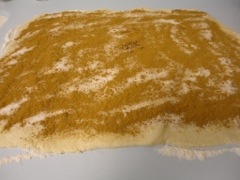
After dough has risen in fridge, (dough should be at least doubled in size) remove from mixing bowl and roll out on floured surface. Roll dough out to about 1/4 inch thickness in rectangular shape. Spread surface of dough with softened butter. Sprinkle buttered surface of dough with granulated or brown sugar, then with cinnamon. Cover the dough liberally with sugar and cinnamon. Roll up jelly roll fashion and slice rolls about 1 inch thick. Arrange slices in baking pan and allow to rise. You can let the rolls rise at room temperature for a couple of hours, or turn the oven on the lowest temperature (about 170 degrees) and let the rolls rise in the oven for about half an hour, as described in notes above.

When rolls have risen (at least double in size) bake at 350 degrees for approximately 35 minutes.

Icing
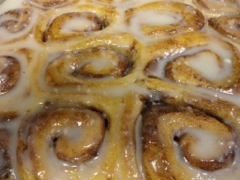
Combine a couple of tablespoons of melted butter, powdered sugar (I use two or three cups of powdered sugar) and milk (drizzle a little milk in until the icing is the consistency you want. It can be spreadable or pourable). Add a teaspoon of vanilla to icing and spread over warm rolls. If you make too much icing, this will keep in the fridge for several days. You can also use this icing on almost any dessert…handy to keep around for pound cakes, etc. For those who love cream cheese, add 3 or 4 oz of softened cream cheese to the icing and blend to remove any lumps.

Orange Rolls

I stumbled on this option (I was out of cinnamon and discovered my predicament at the last minute when I was making these recently) and it makes a nice citrusy treat.

All the steps for making the dough are the same, through rolling the dough out and spreading with butter and sprinkling the dough with granulated or brown sugar. I use less sugar in this variation, and I don’t measure these amounts, but I cover the dough a little more lightly with sugar than when I am making the cinnamon version. This can be adjusted to personal taste. After spreading the rolled-out dough with butter and sugar, using a jar of orange marmalade, (I use Smuckers marmalade) spread this over the sugar, roll up, and slice rolls to place in baking pan. (The marmalade can be a bit tart, and I use the sugar in the filling to cut the tartness of the orange peel in the marmalade.) Allow rolls to rise and bake as described above.

For the glaze, instead of adding vanilla extract and milk to thin the glaze, I use orange juice and a few drops of orange flavoring, or you could grate a little orange zest in the glaze if you have a fresh orange. Don’t add cream cheese…you just want to punch up the orange flavor.

20111211-190617.jpg

20111211-190636.jpg

20111211-190703.jpg

20111211-190718.jpg

20111211-190729.jpg

20111211-190741.jpg

Preserved lemons; or, genetic memories calling?

I’m preserving lemons even as I write. It is a work in progress. Yesterday I satisfied my inner Martha Stewart with a home kitchen exercise that fulfilled multiple needs at once. The prep work for making preserved lemons is ridiculously fast and simple. But as the process itself takes about three weeks of wait time, the jar of lemons sitting in plain view all that time on my kitchen counter, it feels like I’m engaged in a much more complex endeavor. And the result, three lemons, so beautifully softened by kosher salt and time, can be stored in the fridge for up to a year. Nice! I’ll have a lengthy period of time to enjoy the fruits of my labors.

Let me tell you how intense those labors were.

20110822-082038.jpg

It all began with a beautiful image of these lemons on a food blog. The accompanying text promised flavor so luscious, so bright, so wonderful…well, I was inspired to put my hands on a Mason jar and buy some new lids to try this at once. There isn’t really even a recipe. You just choose the size jar you want to use, select a few lemons (I used three); you wash and quarter the lemons, slicing not quite through with each cut, so that the pieces stay attached. Then you fill the cut areas with kosher salt, stuff the lemons into the canning jar, and put a lid on. You don’t even have to go through a sterilizing process, just run the jar and the lid through the dishwasher before using. I did add a little extra salt on top of the last lemon, following the well known, “if a little is good, a lot is better” philosophy. That’s it. Now I just wait for the magic to happen.

Supposedly, in the next three weeks, the lemons will soften, and their flavor, enhanced by the salt, will intensify. You can use slivers of the lemon rind in salads, or add slices to roasting meat, or find your own unique ways to utilize your bounty. Already, overnight, the lemons have released some of their juices; a small amount of liquid has pooled at the base of the jar. I understand that lemon-watching can become quite an obsession during this period, requiring regular checks to see what they’ve done overnight, or since I left for work, or between dinner and bedtime…you get the idea. I’m going to have a regular entertainment center on my counter!

I’m looking forward to trying these in my favorite lemony recipes. But the preserves are just the bonus. The real joy in this is that I’m feeding some need within myself to be domestic, beyond home-cooked meals and laundry processing. I don’t understand where it comes from. I’m not even aware the need is there. Until I see something like this blog post, and I’m fired with an intense desire to can, or preserve, or somehow participate in the time-honored arts of a farm kitchen.

Really, if I believed in genetic memory, I would think I’m experiencing the combined promptings of grandmothers, great-grandmothers, and all sorts of extended kin, who were queens of the garden: canning, freezing, making jams and pickles all summer. Like the little red hen, immortalized in the story of an industrious chicken who works for her chicks, my ancestors were not corporate ladder-climbers. But they worked, none the less. It would even be safe to say they were driven: growing, harvesting and processing all season long. As a child, my summers were blighted with never-ending buckets of black-eyed peas, butter beans, and worst of all, lady peas, those tiny peas that require HOURS of shelling to produce a “mess” of peas large enough to be worth cooking. My siblings and I shelled, and shelled, and shelled some more.

Then I grew up and left home, and I don’t think I’ve shelled anything since. I’ve dabbled in flower gardening, actually grown a few tomatoes and herbs. This year I grew a pot of lettuce, and I have a pot of rosemary. My prize outdoor edible is a rhubarb plant. I love to harvest the stalks and chop up quantities to freeze for winter cobblers and pies. That’s pretty satisfying. But there’s something about canning…don’t know what it is. Mind you, I don’t really want to go whole hog. I don’t want to invest in home canning operations or stockpile jars. But now and then, a little freezer jam, or this find…preserved lemons…that seems just about right for me. I get all of the pleasure of anticipating jars of produce, thriftily and skillfully (!) stored for later use, without the intense labor of serious canning.

My next effort at this type of kitchen magic is making my own vanilla. Found a recipe (same thing, you just split vanilla beans open, add a good quality vodka, and wait for the liquid to darken). Simplicity in itself! The particular charm here is the beautiful jars I’ve found for vanilla storage. I have to admit, that’s the real hook of this experiment. I have a long-standing clear glass fetish love of clear glass, and cool bottles always call to me. Check out this company: see my find? You can order in bulk, or buy one bottle at a time. How fun is that?! But more on this later, when my bottles have arrived and I’ve completed my commitment to the lemons.

As an adult, I turned to people like Martha Stewart for inspiration. She gardens more elegantly than my family members did, I have to give her that. When Martha is in her garden, she looks invitingly rustic, never seems to break a sweat, or even get very dirty; and she always has interesting tools, perfect rows of plants, or wonderful raised planter boxes, no doubt designed by an upscale firm specializing in agricultural architecture. Martha changed my view of gardening. It went from something decidedly un-glamorous to a skill to be proud of, or at least interested in. Thus my move from reluctant child pea-sheller to an adult, able to appreciate the pleasure of having home-grown produce. I’m happy to say that for many years now, I’ve appreciated the talent and skill that I was dismissive of when I was younger. It seemed a given at the time. Didn’t everyone’s grandmothers garden and can?

Well, maybe there is something to genetic memory. Or at least the inspiration that comes from memories of seeing the hard work and skill that generations of women put into feeding families. Martha made it cool to be in the kitchen, to have my own domestic skills. But my grandmothers made it real for me. I can close my eyes and see rows of finished cans of beans lined up on the counter, or freezer bags full of corn, cooling, waiting to be tucked away for a winter meal.

Hmmm…wonder what else I can preserve in salt…or vodka…I might be on to a whole new thing. And if it’s a good thing (thank you, Martha!), some lucky ones of you might be getting these as Christmas happys. We’ll know in about three weeks.

In the meantime, if you’re wondering, I’ll be perched at my kitchen counter, watching the magic unfold in slow motion.

Signature Recipe – my favorite salad

I don’t often think of myself as having “signature” characteristics or likes. I don’t have a signature color (although I wear a lot of green, and black figures prominently in my wardrobe as well). I don’t have a signature fragrance. I like a variety of perfumes and colognes. But as we go through life, we all find ourselves gravitating to some things again and again. I think I can safely say that I have a signature salad because this really is my favorite, and the recipe I go to most often when I need a green and leafy element in any meal.

So, one of the few recipes I would tag with the term “signature:”

Sheila’s Salad

Mixed spring greens, or baby spinach leaves
Thinly sliced red onion rings, separated
Fresh cilantro leaves (I like lots of cilantro!)
Craisins, or you can substitute fresh seedless red grapes or raisins
Roasted Pecan halves
Crumbled Feta cheese (be generous)
Freshly ground black pepper, to taste

Salad dressing of your choice (creamy poppy seed, huckleberry, or wine vinagrette work well with these flavors.)

20110710-090628.jpg

You can use as much or as little of each ingredient as you like. I would suggest a ratio of salad greens and the remaining ingredients in a proportionate amount: half greens to the remaining ingredients. The feta cheese and pecans provide a savory flavor, while the craisins or alternate fruit adds just the right balance of sweetness. You can also make this a dinner salad by adding sautéed shrimp or grilled fillet of salmon or halibut, flaked into bite-sized pieces. The contrast between the chilled greens and the hot grilled or sautéed seafood creates a perfect light but satisfying summer entree.

Enjoy!

Perfect Biscuits; or, how to follow directions

Southern Living Buttermilk Biscuits

I grew up in the South. I had grandmothers who cooked; a mom, aunts, cousins, a mother-in-law who are all stars in the kitchen. And I don’t do too badly myself, in some areas. But I’ve always been defeated by biscuits. I know, they’re such a Southern staple…tragic that I couldn’t produce a successful version of that breakfast icon.

Over the years I’ve collected a variety of recipes, each promising to be the best, the fluffiest, the epitome of biscuitness. And every time I’ve tried a new recipe, I’ve had another disappointment.

Last weekend I was doing a little internet surfing and stumbled across a classic Southern Living recipe for buttermilk biscuits. The photos looked so amazing, I decided to give it one more try. And I produced perfection! I’ve probably even made this recipe, or something very similar, before. So what was the variable this time? Well, for the first time ever, I baked the biscuits at the temperature the recipe specified! I know right now you’re thinking, why would you not bake at the temperature the recipe gives?

I like lightly browned breads, nothing too crisp or crusty. So I’ve always baked at a lower temperature, thinking that would keep my biscuits from browning too much. But when I actually baked them at 450 degrees, they puffed up to an amazing height. To my surprise, they were lightly browned on the exterior and were the perfect pillowy texture on the inside.

There are times that it is good to think outside the box. There are times when it is good to make your own rules, to do what works for you. But there are also times when following the rules pays off. You don’t need to reinvent the wheel for some things. Biscuit recipes work as they’re written. Math works according to known formulas. Sometimes the best course is to see what has worked for others and to copy what has been successful. That doesn’t mean you don’t have creativity or ability to be original. It may mean that you are smart enough and humble enough to recognize that others may know a thing or two. That you may not always have the best answer, the best idea.

The trick is to know what strategy to use for the given situation. From now on, if I’m making biscuits, I’m going to trust the recipe and “bake as directed.” How many times I’ve read that instruction, and how frequently I have not baked as directed! And what else have I mis-managed because I didn’t follow the directions? On the other hand, there are situations in life that demand that I listen to my heart, that I follow my instincts.

Maybe that’s the challenge for each of us…when to conform and when to stand up and follow our on path. I don’t have all the answers. A lot of the big questions of life are complex, and there may not even be one “right” answer for some things. But I’ve learned that’s not the case for baking biscuits. It’s good to follow the recipe. It’s good to follow directions.

Perfect Southern Living Biscuits

Ingredients

  • 1/2 cup cold butter
  • 2 1/4 cups self-rising soft-wheat flour
  • 1 1/4 cups buttermilk
  • Self-rising soft-wheat flour
  • 2 tablespoons melted butter

Preparation

  • 1. Cut butter with a sharp knife or pastry blender into 1/4-inch-thick slices. Sprinkle butter slices over flour in a large bowl. Toss butter with flour. Cut butter into flour with a pastry blender until crumbly and mixture resembles small peas. Cover and chill 10 minutes. Add buttermilk, stirring just until dry ingredients are moistened.
  • 2. Turn dough out onto a lightly floured surface; knead 3 or 4 times, gradually adding additional flour as needed. With floured hands, press or pat dough into a 3/4-inch-thick rectangle (about 9 x 5 inches). Sprinkle top of dough with additional flour. Fold dough over onto itself in 3 sections, starting with 1 short end. (Fold dough rectangle as if folding a letter-size piece of paper.) Repeat entire process 2 more times, beginning with pressing into a 3/4-inch-thick dough rectangle (about 9 x 5 inches).
  • 3. Press or pat dough to 1/2-inch thickness on a lightly floured surface; cut with a 2-inch round cutter, and place, side by side, on a parchment paper-lined or lightly greased jelly-roll pan. (Dough rounds should touch.)
  • 4. Bake at 450° for 13 to 15 minutes or until lightly browned. Remove from oven; brush with 2 Tbsp. melted butter.

Enjoy! And don’t under-bake!

Best Fudgy Brownies

These are the BEST fudgy brownies!

Ok, I know this is going to be hard to believe for brownie lovers, like me, who are ever in search of the perfect brownie recipe. But I think I finally have my favorite for a basic fudgy brownie. No cream cheese here, no peanut butter, no additional exotic flavors…just good old-fashioned chocolate nuttiness. And the best part…no expensive or hard-to-find chocolate required. And since this recipe is made from scratch and standard pantry/fridge items, you don’t have to remember to pick up a mix to have these decadent chewy morsels any night of the week. The process is simple too: all you need is a bowl and whisk.

You won’t BELIEVE how basic this recipe is:

  1.  2 eggs
  2. 1 cup granulated sugar
  3. 1/2 cup (1 stick) butter, melted (I use salted or unsalted, whatever I have on hand)
  4. 1/2 cup all purpose flour
  5. 1/3 cup Hershey’s Cocoa powder
  6. 1/4 tsp salt
  7. 1 or 2 tsp vanilla extract (use ONLY real vanilla extract, makes a big difference)
  8. 1 cup chopped walnuts or pecans

 Method:

  1. Butter or spray with baking spray an 8” x 8” baking pan, or you can also use an 8” pie dish for these if you want to serve the brownies in pie shaped wedges.
  2. Heat oven to 350 degrees ( I like my brownies a little under-baked, so my trick is to bake these in a slightly cooler oven, 325 degrees).
  3. Beat eggs; blend in sugar and melted butter. Stir in flour, cocoa powder and salt. Add vanilla extract and chopped nuts.
  4. Pour into a prepared pan. Bake 25 to 30 minutes or until ALMOST set. Brownies will not test done in center. Cool for a few minutes, or as long as you can stand to wait; cut into squares or wedges. Serve warm with ice cream or whipped cream. Serves 6 to 8, depending on how generously brownies are cut.

 Recipe can be doubled if preparing for a larger group.

Enjoy! And let me know what you think.